
Insulation Frustration!!!! Living in the “frozen tundra” can be harsh on homes, cars and your energy bills! Many older homes I inspect have marginal insulation in the attics which may have been acceptable at that time. As protocol I recommend adding additional insulation to improve the efficiency and comfort of your home but within reason to what will work best for the style and age of the home. Heres where the problem lies…Was it installed properly? Did you hire a professional or did you hire your cousin who did construction for a summer? Many people think it’s as easy as throwing or blowing new insulation in the attic..what could go wrong? After blowing all that insulation in the attic did it cover the ventilation? Did you seal the attic bypasses (points of air leaks into the attic) before insulating? Did you cover light fixtures not rated for insulation contact? Did you insulate directly to the chimney flue?
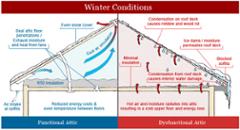
I know I know soooo many rules and procedures to follow you may be asking yourself why??? Let’s start with ventilation in the attic. This aspect of the building envelope is huge in how the components in the attic will react to the reduced airflow. Thermal insulation blocking the soffit vents severely reduces attic ventilation, which in turn results in elevated roof temperatures that can reduce the long-term service life of asphaltic roofing materials. Inadequate attic ventilation can also result in elevated moisture levels that can damage materials and promote biological growth such as mold that can be a health hazard for some people. After the insulation has been installed it can be a real pain to fit into those tight areas to restore airflow with the Installation of baffles from the soffit vents into the attic while still providing good insulation coverage. More insulation doesn’t always mean a good thing blown insulation works best when it is not compressed and spread evenly.
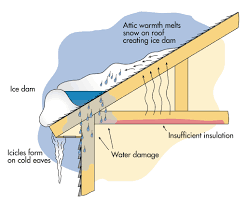
Second on the list..areas of air leakage into the attic space. If you don’t seal off areas where air can leak into a cold attic you will get condensation, frost, Ice dams, and potentially mold. One of your largest areas of energy/heat loss is through these air leaks. Sealing these areas before installing insulation will save a lot of grief and wondering why you have ice damming, melted snow in specific areas of your roof, installing heat tape to prevent ice damming and high energy bills. These areas don’t have to be large to cause large problems and can be as simple as additional insulation or caulking..the problem is finding them and getting to them.
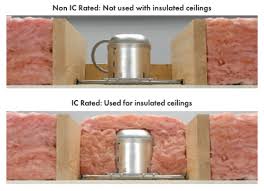
Lastly is the safety hazard of installing insulation over the top of non I/C can lights. This is usually not on anybody’s radar when insulating and can be easily missed as getting to the can lights can be a task or finding the rating on it may not be the easiest either. Typically an non-IC-rated (or “DCIC-rated”) recessed light must be 3″ from insulation and 1/2″ from other combustibles such as wood framing, roof sheathing, subflooring. Installing a non-DCIC or non-IC-rated light fixture where we cover it with insulation is a long-known hazard: the fixture overheats and either fails-safely by burning up and out but contained within the fixture itself, or worse, it starts a house fire. Now this is a worst case scenario but there is a reason why manufacturers make these specifications and restrictions on their products.
In conclusion if you are to do your own improvements do your homework make sure you are taking the rights steps to help your situation and make life more difficult and expensive down the road. Attached is a link to Wisconsin programs that may include rebates for making you home more energy efficient click here.